Nighttime Lighthouse Photography

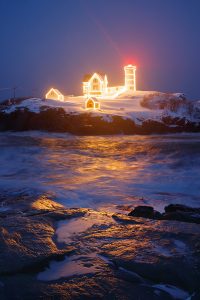
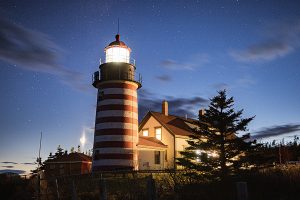
Maine’s lighthouses are immensely popular locations for photographers. The variety of light, weather, and seas surrounding these beacons provides great opportunity to capture beautiful photos. However, what has become increasingly popular is photographing lighthouses at night to create imagery of them in their element, shining out over the dark coastline. So let’s talk about some of the basics that you should know before heading out to photograph these amazing structures after dark.
Gear: When shooting photos under the dark of night, the gear you have with you is perhaps the most important thing to consider. First, you are going to want a camera that allows you to manually set your exposure and ISO settings. This is important because automatic shooting modes, which you can use with great success under good lighting conditions, are not well suited for shooting in such low light. Just as importantly, you are going to need a sturdy tripod to mount your camera on.
I would also recommend a cable release or remote shutter for your camera, so that you can fire an exposure without touching your camera. Your camera can shake for a quick moment after you’ve touched it and that will ruin a shot with the longer shutter speeds you will need to use.
Extra batteries are a must as the longer exposures will use more battery power and if you happen to be shooting during the winter, this will happen even faster.

There are other pieces of gear you should have with you as well, the first of which would be a headlamp. This is an invaluable piece of equipment that I always have with me. This allows me to see where I’m walking while keeping my hands free, which is important when you’re climbing over slippery rocks and uneven terrain that surround these lighthouses. In the warmer months of late spring to early autumn, be sure to have some form of insect repellant as the mosquitos can be quite fierce at times. If you are attempting a photo shoot during the winter months, hand warmers and insulated shoes are a huge help and will allow you to shoot longer and be more comfortable.
Location Scouting: If you are unfamiliar with the location of a lighthouse you plan to go shoot, I would highly recommend that you take the time to scout the location beforehand to get an idea of what you might be looking for. Or get there early and plan your compositions before the light fades so that you can actually see what your scene looks like fully illuminated, and recognize what kind of distractions might be present. Intimately knowing the coastline, and where potential compositions are, makes getting the shot you want so much easier. You should also get an idea of how the tide affects the location and then in turn, how that impacts the compositions you want to shoot.

Camera Settings: There are no rules on what kind of camera settings you should use. Night photography is very much the same as any other genre of photography in that you should use whatever settings are necessary to achieve the artistic vision you are looking for.
There are a few general thoughts I can share here, but it will still end up going back to your artistic vision and what kind of images you want to capture when you are on location. For me, clouds play a large factor in what kind of image I’m going to shoot. On nights where there are no clouds, it generally leads me to try and capture the beauty of the countless stars that cover the night sky. However, the stars are constantly moving across the sky, much like the moon and planets, which requires shorter exposures in order to capture pin-sharp stars. There is a calculation called the “500 Rule” that photographers will use to figure out what the longest shutter speed is that they can use to capture stars before they start to turn into streaks of light. This calculation works by dividing 500 by the focal length of the lens you are using (ex: 500 ÷ 24mm lens = 20.8 second exposure). Just remember that if you are shooting on a crop sensor camera, you will have to calculate the correct focal length for the fraction to remain correct. I’ve found the 500 Rule to be a little too generous on the length of exposures and usually end up exposing at least 1-2 stops under it’s recommendation, but it can provide a good starting point. Of course if you are going to use shutter speeds under 30 seconds, you are going to have to bump your ISO up, which generally will have to be up toward 6400 or higher. Opening up the aperture on your lens will aid you in being able to use either faster shutter speeds or a lower ISO.
On cloudy evenings when the stars are not visible the exposure times are less important, which will allow you to lower the ISO and close down on your aperture to capture a larger depth of field. Exposure times can easily be minutes long on these images, which will give you a much cleaner file thanks to the lower ISO as well as totally smooth out any water that might be in your image. You can also use longer exposures on clear nights if you want to get creative and capture star trails, where you see the stars blur in large streaks of light that circle across the sky.

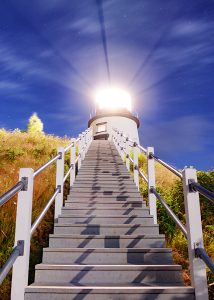
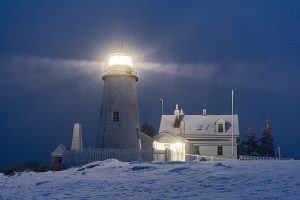
Watch the Weather: Much like any other photo shoot you might plan, weather can be a huge factor in your night photography. Some of the best conditions for shooting lighthouses at night are when either fog or snow is blowing through the air. What makes both of these weather phenomenon great for night photography at lighthouses is that the moisture in the air catches the light emitted from the lighthouse, allowing you to see the classic spokes of light streaking from the lantern and out into the distance. It is an amazing sight and a must-see for those who shoot lighthouses. Wind is also a major factor in night photography due to the long exposures necessary, as even a slight vibration caused by gusty winds can ruin an image.
Lighthouses are a treat to experience under the darkness of night, especially watching their powerful lights shining out over the coastline. Photographing them in these conditions has become much easier as digital cameras have improved in low light performance. So hopefully this article will inspire you to try capturing the beauty of these guardians of our coast as they shine though the darkness!

Leave a Reply